Showing posts with label felt. Show all posts

Thursday, 15 August 2013

DYI tooth fairy pillow

We’ve introduced to Mayi Carles of Heartmade before and now we’ve got another of her terrific tutorials to share with you today. This time it’s for the little ones – a tooth fairy pillow.
This little felt envelope is perfect for storing those baby teeth before the tooth fairy makes the exchange. It’s also a great place to stash the cash.
Looking for fab fabrics for this project or the next? Well, you’re in luck! At Fabric and Textile Warehouse you’ll find a wide range of fabrics, lace, and more. Just pop on down to your local store. Feeling a tad lazy? Then, just give us a call on our GOLDEN NUMBER (0861 322 839 | 0861 FAB TEX) to find out more about what’s in stock and on special. You can also take a sneak peek at our ONLINE CATALOGOUE when you click here.

Hey, while you’re at it why not send us a FRIEND REQUEST on Facebook and FOLLOW US on Twitter. You can also FIND US on Pinterest. 

Monday, 12 August 2013

DIY felt pinwheel comb

There is just something so whimsical about pinwheels. We suggest adding a bit of charm to your everyday wear with these playful pinwheel combs from Heartmade. Not a comb kinda girl? Then add them to bobby pins, headbands, clips and/or broach pins.

Find felt and much, much more at your local Fabric and Textile Warehouse. Just give us a call on our GOLDEN NUMBER (0861 322 839 | 0861 FAB TEX) for more info.

Before you log off, why not check out our online catalogue. You could also join our social network. Just send us a FRIEND REQUEST on Facebook, FOLLOW US on Twitter and/or FIND US on Pinterest. That way you’ll be kept up=to-date with our latest news and specials.

Friday, 9 August 2013

Button bouquet: round two

We’ve already shared one button bouquet with you, and now we’re bringing you another. This time you’ll need a bit more than just an extensive button collection, but the result is just as spectacular.

You’ll need:

Buttons
Felt
Needle & thread
Ribbon
Scissors
Skewer sticks

Instructions:
  • Start by cutting flowers from your felt.
  • Thread the buttons onto your felt flowers, making sure to keep and excess length of thread on the backside of the flower. You’ll need this thread to secure the flower to the front of the stick. Alternatively, you could always use a spot of glue to keep it in place.
  • Tie small strips of ribbon around the stick to resemble leaves.
  • Plop your bouquet in a vase and you’re good to go.
This tutorial was adapted from the Spring Bouquet by American Crafts Studio. 

Looking for fab fabrics for this project or the next? Well, you’re in luck! At Fabric and Textile Warehouse you’ll find a wide range of fabrics, lace, and more. Just pop on down to your local store. Feeling a tad lazy? Then, just give us a call on our GOLDEN NUMBER (0861 322 839 | 0861 FAB TEX) to find out more about what’s in stock and on special. You can also take a sneak peek at our ONLINE CATALOGOUE when you click here.

Hey, while you’re at it why not send us a FRIEND REQUEST on Facebook and FOLLOW US on Twitter. You can also FIND US on Pinterest. 

Sunday, 24 March 2013

Holiday craft: The DIY Rocket Powered Jet-Pack

Want an Easter break packed full of rocket fuelled fun? Then click here! Doodlecraft’s DIY Rocket Power Jet-Pack is quick and easy playtime charm that’ll entertain your space cowboys for hours. 
If you’re looking to stoke the flames then you’d better visit our felt collection.  And while you are at it why not pick up a few pieces for your little girl and this fab peacock tutu.

Give us a call on our GOLDEN NUMBER (0861 322 839 | 0861 FAB TEX) for more on what’s in stock and on special this holiday season. You can also send us a FRIEND REQUEST on Facebook and follow us on Twitter. 

Tuesday, 12 March 2013

A DIY Shamrock Barrette for St Paddy’s Day

Whether you’re Irish or not, St Patrick’s Day is a great excuse to have a party. Go green this Sunday and join in the fun with this lucky little DIY from Paper and Ink. 


You’ll need:
Green felt
Needle and thread
Blank barrette
A modified version of this template from Martha Stewart (Brenna, the genius behind Paper and Ink, changed the shape of the petals, giving them 2 lobes each and flipped them, preferring the shape of the bottom of the flower for the clover).

Instructions:
  • Cut 4 leaves in the shape shown above. Brenna’s were about 2 cm (3/4 of an inch) tall and nearly an inch wide. 
  • Sew the leaves together as shown above, and tie the threads together tightly at the ends. 
  • Sew to a barrette, and clip on your little lucky charm.
The 17th of March may only come around once a year, but Fabric and Textile Warehouse is open 7 days a week. Don’t forget about us when it comes to planning your next big bash. We’ve got a lot more than just felt to help you out. Get easy-to-clean tabling, elegant jacquards, playful ribbons and more in store today.

For more on what’s in stock and on special give us a call on our GOLDEN NUMBER (0861 322 839 | 0861 FAB TEX). You can also send us a FRIEND REQUEST on Facebook or follow us on Twitter and stay up to date with our latest news and specials.

Thursday, 14 February 2013

From fish to sushi: the making of a plushie

This has got to be one of the most popular and fun tutorials you’ll find on Cut Out& Keep. It involves the creation of a fish plushie (a small felt toy) that can be turned in on itself to form a sushi roll. If you think that sounds entertaining then you’re certainly not wrong.
 
Click here for the tutorial.  

Once you’ve made one, you’re sure to want a whole shoal. Visit your local store and stock up on some fabulous felt and colourful thread before you start stitching. Give us a call on our GOLDEN NUMBER (0861 322 839 | 0861 FABTEX) to find out more about what’s in stock. You can also send us a FRIEND REQUEST on Facebook or follow us on Twitter and stay up to date with the latest news and specials.

Thursday, 20 December 2012

Inspiring superheroes and princesses with creative crafts

In the land of make believe nothing is more fun than school holidays - a time of year when your adventures are not limited by break times and alarm clocks. Join in and inspire this festive season with these great kiddie necessities from Cutesy Crafts. There’re crowns for your princess and masks for your superhero. Just click here and here and take a journey you’re sure to enjoy and never forget.


Felt is just one of many fabulous fabrics you’ll find at your local Fabric and Textile Warehouse. . For more info on what else is in stock & on special, give us a call on our Golden Number: 0861 322 839 | 0861 FAB TEX. You can also send us a FRIEND REQUEST on Facebook or follow us on Twitter and stay up to date with the latest news and specials.

Saturday, 15 December 2012

The Great Geek Gift: A Tiny Yoda Keyring

Thanks to TV shows like The Big Bang Theory peeps around the world are letting their geek flag fly. Why not give the geek in your life something homemade and extra special this Christmas, a tiny Yoda keyring.

This tutorial was posted on Cut Out + Keep by Lauren of Port Elizabeth (Click here to view the tutorial). Unfortunately you are going to have to sign up to Cut Out + Keep to get a hold of the pattern. What are we saying? Unfortunately – bah! You crazy crafters are going to love this site. It’s filled with great tutorials and interesting ideas. If you find anything particularly amazing share it with us. You can find us on Facebook and Twitter, or just leave us a comment below.

Need felt? Thread? A needle? Get them and more at your local Fabric and Textile Warehouse. Give us a call on our Golden Number 0861 322 839 | 0861 FAB TEX for more what’s in stock and on special this festive season.

Send us a FRIEND REQUEST on Facebook or follow us on Twitter and stay up to date with the latest news and specials.

Wednesday, 5 December 2012

Have a colour-filled Christmas! A Felt Christmas Tree Ornament Tutorial

We live in a rainbow nation, so why shouldn’t we have a rainbow Christmas tree? Ok, so an entire rainbow tree might be a bit difficult and time consuming to create, and with Christmas less than a month away you might be thinking we’ve gone a tad mad. But we like this idea and have found a quick and easy solution – the felt rainbow Christmas tree ornament!

This fabulous tutorial is the brainchild of Julia Crossland (you can visit her blog here).

You’ll need:
  • A stash of felt pieces in a variety of colours
  • Scissors
  • A ramekin
  • A marker pen
  • Card stock or scrap board
  • Star-shaped cookie cutter

Instructions:
Place the ramekin on the card and trace around it using a marker or pen to create your template. Cut out your template.
Using your template trace and cut a circle out of a piece of felt piece bearing in mind that this will the bottom layer of ‘leaves’ for your tree.
Gradually decrease the size of your template circle to create the subsequent felt layers to your tree until you have a pile of felt discs that, when piled on top of each other, form a Christmas tree shape. If you’re looking for perfect circles you might want to use a compass. Using the cookie cutter, trace and cut out a star shaped piece of felt.
To make the trunk cut a long slim felt rectangle, roll it up and stitch the edge to the main part of the roll.
Now to assemble that tree! After securing the sewn edge with a knot, wheedle the needle through the centre of the trunk until it pops out at the end.
Thread the needle through the centre of each felt disc - you might want to mark the centre of each with a dot before you start.
Finish off the tree by threading up through the star. Make a small knot at the top to secure everything in place. Don’t trim the cotton just yet. Leave a length behind so that you can make a loop and hang your tree on your…um…tree.
Looking for some felt for this project or the next? Give us a call on our Golden Number 0861 322 839 | 0861 FAB TEX and we’ll help you find what you need.

Send us a FRIEND REQUEST on Facebook or follow us on Twitter and stay up to date with the latest news and specials.

Tuesday, 4 December 2012

Great gift craft: The Lucky Ducky

We found this Lucky Ducky on the Nosey Nest Weblog and fell in love with his kind words friendly nature. He or she would make a great gift for the baby or duck enthusiast of the family, don’t you agree?
You’ll need:
-          Felt (at least 3 different colors; yellow for the duck, orange for its beak and wings, and blue for the little pouch)
-          A little scrap of fabric or felt for the heart at the pouch
-          Little black beads for the eyes
-          Some stuffing
-          Beads for decoration - optional
Parts* (click here to download PDF)
  1. Side ( cut twice, yellow felt )
  2. Belly ( cut once, yellow felt )
  3. Beak ( cut twice, orange felt )
  4. Wing ( cut twice, orange felt )
  5. Pouch ( cut once, blue felt )
  6. Heart ( cut once, the little scrap of fabric )
*Enlarge to any size you wish.
Instructions:         
Cut out all the parts – don’t worry about including a seam.
Blanket stitch the two sides together from the top of the beak to the tail.
Put the tummy in. Blanket stitch from tail to beak and then from chest to tail. 
Don't forget to stuff the body before you close it!
Blanket stitch the two beak parts together.
Blanket stitch the beak at lucky ducky's head.
Blanket stitch the little heart on the pouch and the pouch on the duck’s chest. Don't forget to stitch the wings to the body, leaving the tips open. Sew on the black beads for the eyes.
You might want to decorate your ducky with some beads, but otherwise you're done! 
Give us a call on our Golden Number 0861 322 839 | 0861 FAB TEX for info on what’s in stock and on special this festive season. You can also send us a FRIEND REQUEST on Facebook or follow us on Twitter.

Monday, 6 August 2012

Up, up and away! DIY: Hot air balloon nursery mobile.


Take your little one on a journey through the clouds with this delightful hot air balloon mobile.

You’ll need:

A variety of coloured felt
Embroidery needle and embroidery floss
Scissors
Invisible thread (fishing line will also do)
Embroidery hoop
Polyester fiberfill or similar type of stuffing
Old wine corks

Instructions:


  1. Decide on a design for you balloon – are you going to have bunting or multi-coloured panels? This is an important step as it will affect how you’ll go about creating your balloon.
  2. We’re going to focus on making the blue and yellow hot air balloon (this method can be adapted to make other versions of the balloon). Using the pattern as your template, cut eight balloon body pieces or panels out of a single piece of felt. The arrow and triangle shapes for this design were cut free hand from felt of another colour and arranged, with right side facing up, on the balloon body where they were pinned and then stitched in place.
                             
                             
  3. Using a normal needle and thread hand stitch the balloon panels together. There are two important things to note with this step: firstly, make sure that the wrong side of the balloon body is facing outwards when sewing so that, when finished, the stitches will be hidden from view. Secondly, leave one panel only half sewn – this will make it easier to turn the balloon inside out. 
  4. Turn the balloon inside out and finish sewing the final panel in place. 
  5. Stuff your balloon.
  6. Pin and sew the bottom piece into place. 
                            
  7. Attach the cork to the balloons using a needle and thread. If the proportions seem a bit off, try cutting the cork in half before attaching it to the balloon. You can also remove any markings or labels on the corks by giving them a light sanding. 
  8. Finally, attach your balloons to the embroidery hoop using some invisible thread or fishing line.

This is just one of two ways you can use to make your balloons. For the other visit the tutorial’s creator Joy Kelley on her blog how Joyful.

Looking for more great ideas or fabulous fabrics? Contact us on our Golden Number (0861 322 839 | 0861 FAB TEX) or “Friend us” on Facebook and “Follow us” on Twitter and we’ll keep you up to date on what’s in stock and on sale at Fabric and Textile Warehouse. 

Friday, 13 July 2012

The perfect accessory for your little princess – a DIY felt bag


Supplies:
Felt
Sewing machine
Thread
Scissors
Ruler
Button


Instructions:
  1. Start by cutting your felt into strips. You’ll need:  2 pieces 14 cm x 11 cm (bag sides), 1 piece 12 cm x 2.5cm (closing strap), 2 pieces 24 cm x 1.5cm (handles)
  2. Lay the two large squarish pieces together and pin.
  3. Using a maker, draw 2 small squares (5 x 5 cm) in the bottom corners of the bag.
  4. Cut out the squares.
  5. Sew along the sides of the bag (leaving the cut corner open) and along the bag’s bottom.
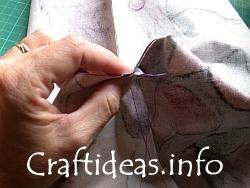
  6. Align the side and bottom seams of each corner and pin the edges together (see image). Sew along this edge to produce a corner on which the bag can rest without toppling over. 
      Aligning the corner seams
  7. Now to create handles for your bag. Pin each end of the handle strips on the inside of the bag. When pinning make sure that at least 2.5 cm of the handle strip is hidden below the bags edge and that all ends are aligned and pinned evenly. Stitch the handles securely in place.
  8. Finally add the closing flap: Measure your chosen button and create an appropriately sized button hole at one end of the strip. Sew the other end of the strap to the outside of the back side of the bag. Fold the strap over the bag and use its button hole to mark where to sew your button. Sew the button. 
If your angel enjoys her new handbag then mosey on over to Craftideas.info where you’ll find this and other creative how to guides. Find everything you need for your fabulous fabric projects at your local Fabric and Textile Warehouse. Need help finding us? Give us a call on our Golden Number 0861 322 839 | 0861 FAB TEX.

Like us on Facebook or follow us on Twitter and stay up to date with the latest news and specials.

Wednesday, 7 December 2011

Cute Christmas Cushion

What You Need
Freezer paper
Felted wool: two 14-x-14-inch squares of light blue, one 13-x-16-inch piece of white, one 5-x-9-inch piece of peach, one 5-x-8-inch piece of red, one 1-1/2-x-8-inch piece of olive, one 3-inch square of gold, and scraps of black
#8 pearl cotton: peach, black, red, and light blue
Polyester fiberfill
Disappearing-ink marker
Sequins: red and iridescent silver
Clear seed beads

How to Make It 
  1. Cut the Felted Wool
  2. Position the freezer paper, shiny side down, over the patterns.
  3. Trace the patterns the number of times indicated.
  4. Cut out the shapes on the traced lines.
  5. Using an iron, press a freezer-paper shape, shiny side down, onto the front of the respective fabric; let cool.
  6. Cut out the shape along the pattern edges. Peel off the freezer paper.
Applique the Pillow
  1. Position Santa's beard and hat on the pillow front; tuck the face behind the beard.
  2. Pin and baste these pieces in place with sewing thread.
  3. Pin the cheeks, eyes, eyebrows, and nose pieces on the face.
  4. Temporarily place the mustache and hair pieces on the face to check the placement of the facial features, adjusting the positions as needed.
  5. Remove the mustache and hair.
  6. Sew the inner edge of the beard to the pillow front with peach running stitches, securing the face at the same time.
  7. Attach cheeks with peach running stitches, stuffing each lightly with fiberfill before completing the stitching. Use black to blanket-stitch the eyes to the face.
  8. Attach eyebrows with peach running stitches. Use peach to blanket-stitch the outer edges of the beard to the pillow front.
  9. Lift up the bottom of the nose to reposition the mustache over the cheeks; tuck the mouth under the center. Attach the mustache with peach running stitches, securing the mouth with the stitches.
  10. Attach the nose with peach running stitches, stuffing it lightly before completing the stitching.
  11. Position the hair fringe to overlap Santa's face and beard; baste the top edge in place.
  12. Blanket-stitch red along the edges of the hat and about 1 inch inside the hat on the left side to resemble a bend.
  13. Blanket-stitch red along the top edge of the green hat cuff. Position the hat cuff on the hat and attach the bottom edge with red running stitches. Remove the basting stitches.
  14. Freehand-draw strings from the tip of the hat with a disappearing-ink marker.
  15. Embroider the strings with red stem stitches and add lazy daisy stitches at the ends. Attach the point of a gold star to each string with a red French knot.
  16. Add a red sequin to the center of each star. Note: To attach a sequin, thread a beading needle with sewing thread. Bring the needle from the wrong side of the fabric.
Finish the Pillow
  1. With wrong sides together, pin the pillow front to the pillow back.
  2. Use a 1/2-inch seam allowance to machine-sew the front to the back, leaving an opening for stuffing. Stuff the pillow with fiberfill and sew the opening closed.
  3. Add blush to Santa's cheeks and nose, up through the sequin, thread on a seed bead, and return to the wrong side of the fabric through the sequin.
  4. Add the remaining star to the hat cuff with a red sequin.
  5. Use the disappearing-ink marker to draw curls on the beard and mustache.
  6. Stem-stitch the drawn lines with light blue. Scatter iridescent silver sequins along the curls and in the hair fringe.
Everything you need to complete this gorgeous Christmas craft is available from Fabric & Textile Warehouse now. Contact us on 0861 322 839 (FAB TEX) or fabrictextilewarehouse@gmail.com for more information, quotes, ideas, and  inspirations. Or pop in to your nearest store in Cape Town, Durban, Richards Bay, or Pietermaritzburg.


Like us on Facebook or follow us on Twitter and stay up to date with the latest news and specials.

Tuesday, 29 November 2011

Fantastic Felt

We have found yet another craft that can keep the kids happy this holiday, and provide you with some adorable little Christmas decorations.


The full pattern for these cute Christmas puddings is available here.

Everything you need to make these and any number of other felt ornaments is available from Fabric & Textile Warehouse. To find your nearest branch, and get advice, tips, tools, notions, and more, email us at fabrictextilewarehouse@gmail.com, or give us a call on our golden number: 0861 FAB TEX (322 839)


Like us on Facebook or follow us on Twitter and stay up to date with the latest news and specials.

Wednesday, 16 November 2011


The wonderful thing about this time of year is that we all get to plan how we spend the holidays with the kids. If you're looking for a project, or just some inspiration, why not try this nifty cushion? Can also make a great gift!

PETAL PILLOW PROJECT

What you need:

- Plate
- Felt
- Tailor's Chalk
- Rotary Pinking Cutter
- Cutting Mat
- Needle & Thread

Getting started:

1. Using a plate as a template, trace a circle on a felt piece with tailor's chalk.
2.From the outside edge, draw a 2-inch-wide (5cm) spiral into the center of the circle.
3. On a cutting mat, cut along the line with a rotary pinking cutter.


3a. When you're finished with step 3, your cut fabric should like Step 3a above. Note the circular center. This will be important when you begin to construct your rose.
4. To start your flower, fold the circular center of the spiral up and over. Secure the base with several hand-sewn stitches in a matching thread.
5. Complete several centimeters of running stitch along the spiral. Holding the thread, gather your fabric and secure it to the flower's center. Continuie stitching, gathering and securing until you have a rose. Finish with a simple whipstitch and trim off the leftover felt.


6. Repeat steps 1 through 5 to construct a second, smaller rose from your trimmed leftover felt. Secure the felt roses to the pillow.
7. For the stem and leaves, hand-stitch small wooden beads to your pillow fabric. DIY Tip: Save time - and your fingers - by hot-gluing a strand of fun beads to the pillow. A simple running stitch of embroidery floss or pearl cotton is a great alternative to beads.

For more projects like this, click here. And don't forget that all the materials, equipment, notions and ideas you need for this and any other project you start this holiday are now available from your nearest Fabric & Textile Warehouse. Pop in to your nearest store, call the Golden number on 0861 322 839 (FAB TEX) or email us at fabrictextilewarehouse@gmail.com.


Like us on Facebook or follow us on Twitter and stay up to date with the latest news and specials.