Showing posts with label sewing. Show all posts

Saturday, 18 August 2012

Getting your panels in a twist!

The Aussie blog Shocking Hocking offered up a twisted tutorial that we thought was too good not to share.

You will need:

·                     heavy duty interfacing (1 piece, 17.8cm x 30.5cm)
·                     ruler
·                     pencil
·                     main fabric
·                     colourful scraps of fabric for the twists at least 3.8cm wide and 12.7cm
NOTE: Starch your fabric - it helps when cutting and piecing

Instructions:
1.       Cut your main fabric into the following pieces:
·         5 pieces, 3.8cm x 12.7cm
·         4 pieces, 3.2cm x 12.7cm  (the spacers)
·         1 piece, 12.7cm x 8.9cm (this will be trimmed later)
·         1 piece, 12.7cm x 16.5cm (this will be trimmed later)
·         2 pieces, 6.4cm x 30.5cm (these will be trimmed later)
2.       Mark up the interfacing with your pencil and ruler:
·         Measure in 3.8cm from each long side and draw a line
·         Measure in 7.6cm from one short side and draw a line
·         From the  7.6cm line, measure and mark a further 4 lines, 2cm apart
·         Set aside for later
3.       Sew your twists:
·         Using all the fabric pieces sized  3.8cm x 12.7cm, sew each of the scrap pieces to a main Fabric piece down one long side and with a 0.6cm seam
·         Press open the seams (this makes it easier to get a good edge), then finger press the twists closed along the seam line, wrong sides together and press again
·         Trim the twists so they are 2.5cm wide and 12.7cm long
4.       Piece the panel:
·         Lay the 12.7cm x 8.9cm on top of the interfacing, right side uppermost and centred between the top and bottom lines, carefully matching the 7.6cm line and edge stitch to hold
·         Lay your first twist along this line, carefully matching the long raw edges and edge stitch to hold
·         Lay one 3.2cm x 12.7cm spacer on top of the twist, matching raw edges and sew through all thicknesses with a 0.6cm seam where you just edge stitched
·         Turn main fabric over to the right and press (the long edge of the folded out spacer should be aligned with the next 2cm line drawn on the interfacing)
·         Edge stitch the raw edge
·         Continue adding the twists in this manner until you have stitched down the last one. 

·         You will not have any spacers left, but that's ok, because now you'll use the 12.7cm x 16.5cm piece to complete the width of the panel
5.       Create the twist:
·         From the back of the piece, sew along one of the 3.8cm lines to hold your twists in place
·         Fold the other end of each twist to the opposite side and pin to hold
·         Stay stitch along the 3.8cm line at the bottom to hold
6.       Complete the panel:
·         Sew the remaining main fabric pieces (30.5cm x 5.1cm) to the top and bottom of the panel and press open
·         Trim the panel and use as you please.

Get everything you need for this project and more at your local Fabric and Textile Warehouse. We also offer great deals on offcuts sold by weight. Give us a call on our Golden Number (0861 322 839 | 0861 FAB TEX) and we’ll let you know what’s in stock and on special. You can also ‘friend us’ on Facebook and ‘follow us’ on Twitter.

Friday, 6 April 2012

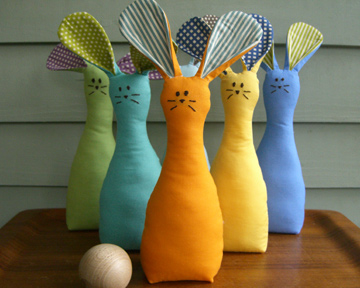
Who’s ready to go bowling for bunnies?


Whilst on the hunt for something fun for Easter, we found, and were bowled over by, these little gems from The Long Thread. Once you’ve finished adding these little critters to your collection hop on over to thelongthread.com and click here to check out their bunny round up: a list of adorable and easy-to-make Easter bunnies.

Supplies:
Cotton, twill or canvas, 27.9 x 27.9cm per bunny
Contrasting fabric for ears
Fusible interfacing, 23cm
Fabric Marker
Matching thread
Embroidery hoop (12.7cm or smaller)
Embroidery thread
Embroidery needle
Polyfill or other stuffing material
Funnel
Rice, 1/2 cup per bunny

Instructions:
  1. Prep the fabrics – wash, dry and press all fabric.
  2. Make your bunny smile – Cut one 14cm x 27.9cm piece of fabric for each bunny you are making. Mark 22.9cm up from the bottom in the centre of the fabric and use a fabric marker to draw the face. Place the fabric in a small embroidery hoop and sew the face.
  3. Snip, Snip – Cut out the paper templates. Fold over the fabric front with your bunny’s face lengthwise, aligning the bowling pin template with the bottom edge of the fabric. Be sure to place the face in the desired spot and cut out the shape. Cut the back of the bunny from the remaining fabric, cutting along the fold again. Cut the ear fronts from contrasting fabric and ear backs from solid fabric.
  4. Sew bunny’s ears – Iron fusible interfacing onto the back side of the bunny ear. Place the ear pieces right side out using a blunt tool. Fold the corners over towards the contrasting fabric and sew 0.6cm from the bottom to create a crease in the ears. Press flat.
  5. Sew your bunny– Place the ears upside down and rights sides facing up on the right side of the bunny back side (You may want to take another look at the diagram quickly). Fold ears and pin them in place, making sure that they are pinned out of the way of the seam allowance. Pin your bunny back to front, right sides together. With a 0.6cm seam allowance, sew along the outside edges and 2.5cm into either side along the bottom. Reinforce with an overcastting stitch, making sure all seams are secure.
  6. Make pleats in bottom – Pull the fabric at the corners to form a right angle in the opposite direction of the stitching. Press flat. Mark a line 1.9cm from the tip of the seam and sew along this line. Trim off excess fabric and reinforce with an overcastting stitch.  Turn the bunny right side out.
  7. Stuff bunny – Using a funnel, stuff the bunny until it is ¾ full with polyfill or other stuffing. Make sure to pack the stuffing in tightly. Using the funnel, fill the remaining space with approximately ½ cup of rice. 

Like us on Facebook or follow us on Twitter and stay up to date with the latest news and specials.

Friday, 23 March 2012

Polar Pleasers

It might still be unseasonably warm, but winter's not far away and being prepared is always smart. Fabric & Textile Warehouse has recently unpacked a fabulous range of beautiful plain and printed polar fleece, absolutely perfect for keeping your loved ones warm and snuggly this winter.

We've rounded up some great patterns to share with you, starting with this super easy blanket. It'll take a leisurely afternoon to put together (no sewing required!), and at just R27.99/m, it's a really easy and affordable way to make someone a perfectly timed winter warmer.

No Sew Fleece Blanket

You will need:
  • 1.2m Polar Fleece (or choose your own size).
  • Rotary cutter (works best to create a neatly cut fringe. If you are using scissors, make sure your cuts are clean, even and straight with no frayed edges.
This blanket is simply made in 5 easy steps:
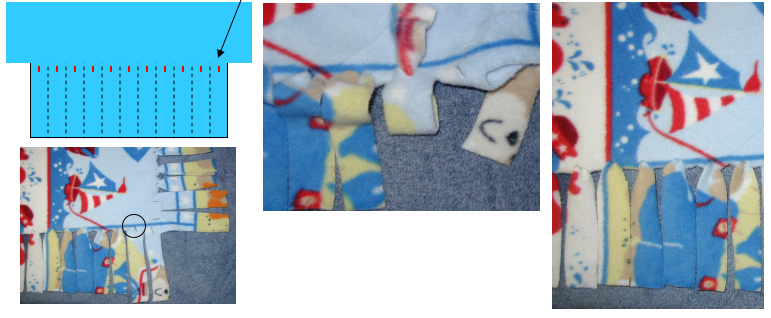
  • Step #1: Before you begin, trim off selvage edges and square uneven edges as needed. (Fig. 1)
  • Step #2: Cut a 10cm square from each corner of the fleece. (Fig. 2)
  • Step #3: Cut 10cm x 2.5cm wide fringe around blanket. (Fig. 3)
Tip: Cut a 10cm piece of fabric or batting to use as your corner template. (Fig. 2) It won’t slip and it will make cutting easier. Using your ruler and rotary cutter cut vertically and horizontally—(arrows) ALMOST to the corner (red circle) but NOT QUITE. Then use your scissors to finish the corner cut. This will give you a crisp, clean cut and you won’t cut into the neighboring fringe. NOTE: Fringe may be cut in 1cm or 2cm increments.

  • Step #4: 
  • Using a seam ripper, make a tiny slit 
  • in the top of each piece of fringe.
  • Step #5: Feed the end of the fringe through the back side of the slit you just cut and pull through to create 
  • a neat and secure fringed edge.
  •  


Click here to download a printable version.


Like us on Facebook or follow us on Twitter and stay up to date with the latest news and specials.

Wednesday, 7 December 2011

Cute Christmas Cushion

What You Need
Freezer paper
Felted wool: two 14-x-14-inch squares of light blue, one 13-x-16-inch piece of white, one 5-x-9-inch piece of peach, one 5-x-8-inch piece of red, one 1-1/2-x-8-inch piece of olive, one 3-inch square of gold, and scraps of black
#8 pearl cotton: peach, black, red, and light blue
Polyester fiberfill
Disappearing-ink marker
Sequins: red and iridescent silver
Clear seed beads

How to Make It 
  1. Cut the Felted Wool
  2. Position the freezer paper, shiny side down, over the patterns.
  3. Trace the patterns the number of times indicated.
  4. Cut out the shapes on the traced lines.
  5. Using an iron, press a freezer-paper shape, shiny side down, onto the front of the respective fabric; let cool.
  6. Cut out the shape along the pattern edges. Peel off the freezer paper.
Applique the Pillow
  1. Position Santa's beard and hat on the pillow front; tuck the face behind the beard.
  2. Pin and baste these pieces in place with sewing thread.
  3. Pin the cheeks, eyes, eyebrows, and nose pieces on the face.
  4. Temporarily place the mustache and hair pieces on the face to check the placement of the facial features, adjusting the positions as needed.
  5. Remove the mustache and hair.
  6. Sew the inner edge of the beard to the pillow front with peach running stitches, securing the face at the same time.
  7. Attach cheeks with peach running stitches, stuffing each lightly with fiberfill before completing the stitching. Use black to blanket-stitch the eyes to the face.
  8. Attach eyebrows with peach running stitches. Use peach to blanket-stitch the outer edges of the beard to the pillow front.
  9. Lift up the bottom of the nose to reposition the mustache over the cheeks; tuck the mouth under the center. Attach the mustache with peach running stitches, securing the mouth with the stitches.
  10. Attach the nose with peach running stitches, stuffing it lightly before completing the stitching.
  11. Position the hair fringe to overlap Santa's face and beard; baste the top edge in place.
  12. Blanket-stitch red along the edges of the hat and about 1 inch inside the hat on the left side to resemble a bend.
  13. Blanket-stitch red along the top edge of the green hat cuff. Position the hat cuff on the hat and attach the bottom edge with red running stitches. Remove the basting stitches.
  14. Freehand-draw strings from the tip of the hat with a disappearing-ink marker.
  15. Embroider the strings with red stem stitches and add lazy daisy stitches at the ends. Attach the point of a gold star to each string with a red French knot.
  16. Add a red sequin to the center of each star. Note: To attach a sequin, thread a beading needle with sewing thread. Bring the needle from the wrong side of the fabric.
Finish the Pillow
  1. With wrong sides together, pin the pillow front to the pillow back.
  2. Use a 1/2-inch seam allowance to machine-sew the front to the back, leaving an opening for stuffing. Stuff the pillow with fiberfill and sew the opening closed.
  3. Add blush to Santa's cheeks and nose, up through the sequin, thread on a seed bead, and return to the wrong side of the fabric through the sequin.
  4. Add the remaining star to the hat cuff with a red sequin.
  5. Use the disappearing-ink marker to draw curls on the beard and mustache.
  6. Stem-stitch the drawn lines with light blue. Scatter iridescent silver sequins along the curls and in the hair fringe.
Everything you need to complete this gorgeous Christmas craft is available from Fabric & Textile Warehouse now. Contact us on 0861 322 839 (FAB TEX) or fabrictextilewarehouse@gmail.com for more information, quotes, ideas, and  inspirations. Or pop in to your nearest store in Cape Town, Durban, Richards Bay, or Pietermaritzburg.


Like us on Facebook or follow us on Twitter and stay up to date with the latest news and specials.

Tuesday, 6 December 2011

Do it yourself, Like Dana

We have found yet another gem online; a blog by a crafty d.i.y-er called Dana, who shares her patterns and tips generously.

She has a very wide range of ideas and projects available. Dana shares her creative mind through sewing, art, design concepts, cooking, and photographic eye-candy. Stop by any given day to see what she's.....MADE.


And any of the notions, fabrics, glues, beads, or other requirements for Dana's sewing crafts can be found at your nearest Fabric & Textile Warehouse. Contact us today on 0861 322 839 (FAB TEX) or email fabrictextilewarehouse@gmail.com to get more ideas and supplies.


Like us on Facebook or follow us on Twitter and stay up to date with the latest news and specials.

Wednesday, 30 November 2011

Inspirations

We recently found a fabulous resource for projects and inspirations: the Better Homes and Gardens website.

This site has excellent ideas and suggestions, and any number of great quilting, sewing, and decorating projects, as well as many other handy hints and tips for around your home.

And don't forget that you can get everything you need for these and other projects from your nearest Fabric & Textile Warehouse: from top quality fabric to any tools and accessories, and all at wholesale prices. Give us a call on 0861 322 839 (FAB TEX) and ask about our countrywide delivery options, or email us on fabrictextilewarehouse@gmail.com


Like us on Facebook or follow us on Twitter and stay up to date with the latest news and specials.

Thursday, 17 November 2011

Year end fashion savers

At this time of year there are so many functions to attend and parties to host, and your favourite little black dress is no longer as trendy as it once was.

Updating your wardrobe can be quick and easy, if you simply turn any beautiful square of fabric into a stylish and multi-purpose pashmina. All you need is a large enough piece of fabric and the ability to sew a straight seam, and you're set! Instantly transform last year's leftover into this year's statement. And why not add a bit of binding, lace, or ribbon edging for that extra flair?

Beautiful fabrics are now available at wholesale prices from Fabric & Textile Warehouse. Call us on 0861 FAB TEX (322 839) or email us at fabrictextilewarehouse@gmail.com for advice, information and directions to your nearest store!


Like us on Facebook or follow us on Twitter and stay up to date with the latest news and specials.

Wednesday, 16 November 2011


The wonderful thing about this time of year is that we all get to plan how we spend the holidays with the kids. If you're looking for a project, or just some inspiration, why not try this nifty cushion? Can also make a great gift!

PETAL PILLOW PROJECT

What you need:

- Plate
- Felt
- Tailor's Chalk
- Rotary Pinking Cutter
- Cutting Mat
- Needle & Thread

Getting started:

1. Using a plate as a template, trace a circle on a felt piece with tailor's chalk.
2.From the outside edge, draw a 2-inch-wide (5cm) spiral into the center of the circle.
3. On a cutting mat, cut along the line with a rotary pinking cutter.


3a. When you're finished with step 3, your cut fabric should like Step 3a above. Note the circular center. This will be important when you begin to construct your rose.
4. To start your flower, fold the circular center of the spiral up and over. Secure the base with several hand-sewn stitches in a matching thread.
5. Complete several centimeters of running stitch along the spiral. Holding the thread, gather your fabric and secure it to the flower's center. Continuie stitching, gathering and securing until you have a rose. Finish with a simple whipstitch and trim off the leftover felt.


6. Repeat steps 1 through 5 to construct a second, smaller rose from your trimmed leftover felt. Secure the felt roses to the pillow.
7. For the stem and leaves, hand-stitch small wooden beads to your pillow fabric. DIY Tip: Save time - and your fingers - by hot-gluing a strand of fun beads to the pillow. A simple running stitch of embroidery floss or pearl cotton is a great alternative to beads.

For more projects like this, click here. And don't forget that all the materials, equipment, notions and ideas you need for this and any other project you start this holiday are now available from your nearest Fabric & Textile Warehouse. Pop in to your nearest store, call the Golden number on 0861 322 839 (FAB TEX) or email us at fabrictextilewarehouse@gmail.com.


Like us on Facebook or follow us on Twitter and stay up to date with the latest news and specials.