Showing posts with label halloween. Show all posts

Wednesday, 24 October 2012

No Sew Superheroes – A guide to cape making


capeHave you got a caped crusader at home? No. Well we think it’s time you did. Keep reading for a DIY cape that would make Superman proud.

You’ll need:
Approx. 1.5 m of knit fabric
1 m of ribbon
Scissors

Instructions:
cape3
  1. Lay your fabric out and fold over one of the long ends by 2. 5cm.
  2. With your scissors make several snips in the fold along the length of the fabric approx. 2.5 cm apart.
  3. Open the fold. You’ll now have several slits to weave your ribbon in an out of.
  4. After the ribbon is woven through all the slits, gather the fabric towards the centre. Take each end of ribbon & loop it back through the last slit and knot. To keep your ribbon ends from fraying you can quickly run the edge over a flame to seal them.
Hop aboard the train to crazy for this and other fabulous homemade costume ideas.

We have wonderful knits, perfect for this and other projects, available in store. Give us a call on our Golden Number 0861 322 839 | 0861 FAB TEX for more info.


Send us a FRIEND REQUEST on Facebook or follow us on Twitter and stay up to date with the latest news and specials.

Wednesday, 17 October 2012

The perfect peacock party frock


peacock tutu_1
This peacock tutu is so amazing you might just want to make one for yourself.

You’ll need:
Tulle, tulle and more tulle (Blue, Teal, Green, Lime and Brown are good choices)
Felt in various colours (preferably choose colours close to that of your tule)                          
Ribbon
Glue gun

Instructions:
  • Start by making your tulle tutu. Click here for instructions on how to create a no sew tutu. To get a more realistic tail effect, only tie you tulle strips to the back of the tutu waist band, with your strips shorter on the sides and longer in the middle.
  • Now for the feathers. Cut your felt into various shapes and sizes that when stacked will mimic the ‘eye’ of a peacock’s feather (see images below). You can now stitch or glue your pieces together.
  • Scatter and tack your feathers along a strip or more of ribbon.
  • Simply tie the ribbon to the back of the tutu and voila! A peacock tutu!

You can find this and other rip roaring costume ideas when you board the train to crazy.

Looking to make believe? With a haberdashery packed to the brim with ribbons, feathers and more, you’ll find everything you need for your trip to Neverland at Fabric and Textile Warehouse. Just give us a call on our Golden Number 0861 322 839 | 0861 FAB TEX and we’ll help you start your journey.


Send us a FRIEND REQUEST on Facebook or follow us on Twitter and stay up to date with the latest news and specials.

Saturday, 29 September 2012

Halloween crafting 101: a dragon’s tail.


We can’t offer you tips on how to train your dragon, but we can show you how to make one. Scare up a treat this Halloween with this dragon’s tail tutorial from Running with Scissors.

You’ll need:
50 to 70 cm of main fabric – you can use pretty much any fabric that's not stretchy
25 cm fabric for spikes
15 cm velcro
Polyfil batting (small bag)

Fabric cuts:
MAIN:  
tail: (cut 2): 5cm x 28cm 
waist straps: (cut 4): 31cm x 8cm
circle: 18cm in diameter *Try cutting an 18cm square, fold it in fourths, then cut the curve from fold to fold

CONTRASTING:
spikes (cut 2): 56cm x 9cm

Instructions:
Trim the tail strips. Lay your two tail strips face down.  On one end you'll measure 4.5" (11.5 cm) from each side. The 2" (5 cm) left in the middle will be the tip of the tail. On the other end, you'll measure 4" (10.2 cm) along the sides as a marker. Connect these two markings to create a diagonal for the cone shape of the tail.  Cut off the triangular sides and throw them away.
Make the spike strip. NOTE: To make the spikes easier, you could cut 1 strip out of felt or fleece and just cut out a spike strip leaving the raw edges that won't fray, rather than sewing your spikes with 2 strips of fabric. Take your two spike strips and lay them right sides together. Draw a row of triangles along the strip for the tail spikes. Begin at one end and work your way to the other, making the spikes shorter and narrower. I left about 1/2" (1.3 cm) between each spike. Sew along your spike line. When you get to the corners it helps to pivot by dropping your needle down into the fabric, lift your presser foot, move the fabric, then start sewing again.  
Once your spikes are sewn, trim along your sewn line with a 1/4" (0.65 cm) seam allowance along the whole strip.
Next, you'll need to trim the seam allowances to make it easier to turn the spikes right side out. On the top of the spikes, you'll trim off the point, being careful not to snip through your seam. In between each spike, you'll snip diagonally into each corner, once again don't snip through your sewing. 
Then you can turn the whole strip of spikes right side out, using a pen lid, knitting needle, etc. to push the tips of the points out.  Iron your spike strip nice and flat.
Sew tail body. First we'll sew the spikes to one piece of the tail.  Pin the largest spike to the tall side of your tail piece, lining up the raw edges. Sew the spike strip to the tail piece with 1/4" (0.65 cm) seam allowance.  This is just basting, or tacking the pieces together.
Next, put your second tail piece so right sides are together, with the spike strip in the middle of the sandwich. You'll sew down the spike strip again, this time with 1/2" (1.3 cm) seam allowance, making sure you sew past the troughs so there is a space between each spike when you turn it right side out. Also, sew a slight curve as you go around the tip of the tail. When you sew around to the other side, you'll need to stop your seam to leave a hole for turning the tail right side out later.  I leave about 4 to 5" (10 to 12.8 cm) unsewn underneath the spikes. This way, it's on the bottom of the tail.
Sew waist straps. Take your 4 strips for the waist straps and put 2 right sides together.  This will give you two sets. You'll sew down a long side, across the short, and up the other long side on each set.  Use 1/2" (1.3 cm) seam allowance. Then you'll need to snip off the corners, being careful not to cut through your seam.
Next you'll turn each strap right side out, pushing out the corners with a pen lid or knitting needle. I like to top-stitch the edges to make the straps lay nice and flat. For this tail I used a zig-zag stitch with contrasting thread, but you could always just sew a straight stitch.
The last step to make your waist strap is to sew your velcro pieces to each end. Center the velcro in the center of your strap and 1/2" (1.3cm) from the very end.
Complete Tail Construction. To close the large end of the tail, first mark the quarters by lining up the top (spike) seam with the bottom seam and pinning the folds on the sides.
Next you'll pin your waist straps inside the tail. Pin the straps to the quarter side marks. The important thing to remember is the velcro has to be pinned opposite so the straps will match up around the waist.  So put one waist strap with velcro down on the right side of the tail, then pin the other waist strap with the velcro facing up into the cavity of the tail.
Sew the straps to the sides of the tail 1/4" (0.65cm) from edge. 
To finish off the tail, you'll pin your circle fabric (with the right side facing into the tail) around the large tail opening. I folded my circle in quarters so that I have a crease vertically and across to use as a guide to pin to the two seams (top and bottom) then line up with the waist straps on the sides. Next you sew around your circle with 1/2" (1.3 cm) seam allowance.
Stuff and Finish. At this point your dino tail is sewn and you can turn it right side out through the hole you left on the bottom seam.  Your velcro waist straps should be oriented to match and stick together, and your spikes should stand up out of the top seam. Next you'll stuff your tail with Poly-fil batting. The density of your stuffing does determine how the tail will look. I stuffed this yellow tail tighter than the blue or green tails, and I noticed it stood almost straight out from the boy's back, where leaving the stuffing a little looser makes a more droopy tail.  Whichever you prefer. Once your tail is stuffed to your liking, pin the hole closed underneath. I chose to just machine sew the seam shut, but it would probably look best to hand-sew the seam closed to allow it to lay flat. You're finished!

Looking for fabric for this project or the next? Give us a call on our Golden Number 0861 322 839 | 0861 FAB TEX and we’ll help you find what you need. 

Friend us on Facebook or follow us on Twitter and stay up to date with the latest news and specials.

Tuesday, 25 September 2012

Have a hoot this Halloween with this DIY owl costume


With Halloween just around the corner we’d thought we’d help out all the mums with a few fun and oh so cute costume tutorials. This first one comes to you from Christine at Pure Joy Events.

You’ll need:
A hoodie
Fleece or Felt – two colours, one of which should be the same colour as the hoodie
Glue
Orange & black foam face masks – you should be able to get these at your local party shop
Paper and white cardstock

Instructions: 
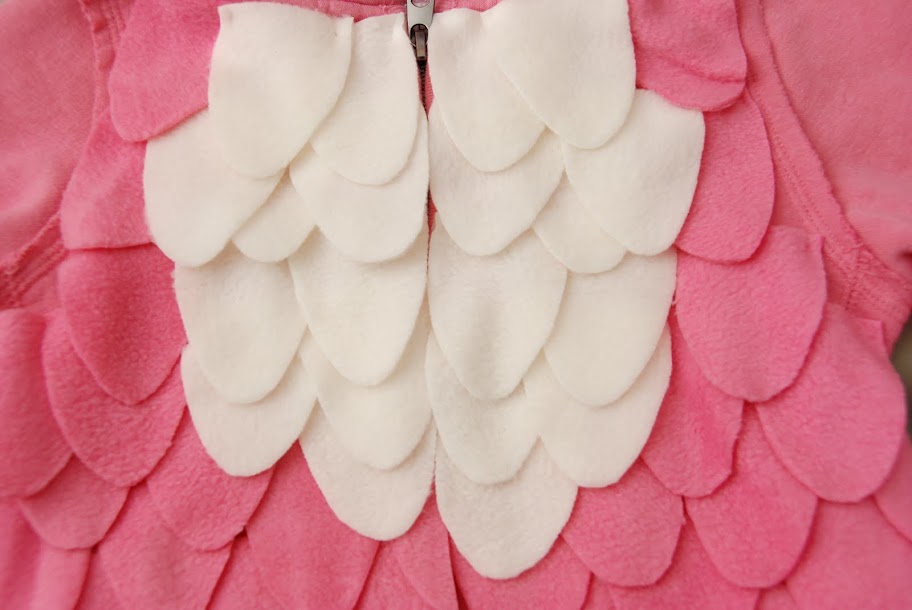
  • Start by printing out the Owl Template 1 (click here for template). Cut a set of wings, approximately sixty individual feathers, and the mask out of the pink fleece. Then cut about twenty individual feathers out of the cream fleece.
  • Starting at the bottom of the hoodie, sew a row of pink feathers. Create overlapping layers of feathers as you work your way up the hoodie. 


  • Flip the hoodie to the back and sew the wings along the seam of the arms.


  • Print Owl Template 2 on white cardstock and cut out the pieces. Cut the beak out of the orange foam mask. (If you couldn’t find the masks at the party shop we recommend either making your own or attacking your kids foam bath toys collection – just try to be sneaky about it)
  • Line the black foam mask along the bottom of the white mask and cut out the eye holes.

  • Glue the pink mask on top of white mask, the black circles over the eye cut outs, and then the lashes.

  • Turn over the mask and cut out the eye holes. Then glue on the black foam mask and orange beak. And you’re done!


Click here and be transported to Pure Joy Events blog where you’ll find a treat bag that is the perfect Halloween accessory. 


Looking for specific fabric for this spooktacular project or the next? Give us a call on our Golden Number 0861 322 839 | 0861 FAB TEX and we’ll help you find what you need. 


Friend us on Facebook or follow us on Twitter and stay up to date with the latest news and specials.